
Everything you need to know to get started.
Everything you need to know to get started.
Getting Started
First things first, you'll need to download PteroBill. You can find a download link in your client area after your order has been completed. Once you download the zip and extract it you'll find installation instructions in the INSTALL.txt file.
Once you've installed the module you're ready to start configuring your servers and products. If you have used the Pterodactyl-WHMCS module before then much of this process will be familiar, however products cannot be directly switched from Pterodactyl-WHMCS to PteroBill. If you have problems make sure you followed the setup instructions carefully, because there are important differences between the two.
Server Configuration
In order to create Pterodactyl servers you'll need to create a WHMCS server.
Under Setup -> Products/Services -> Servers create a server.
The Hostname field should be the hostname of your Pterodactyl panel, example: panel.pterobill.com.
At the bottom under Server Details select PteroBill as the Module.
The Username field can be left blank.
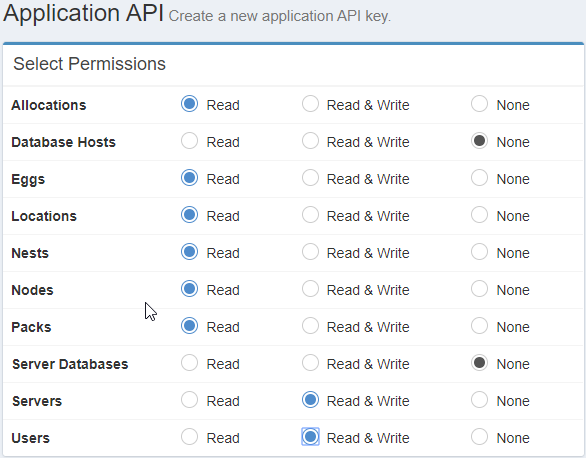
In a separate window login to your Pterodactyl panel. You'll need to create an Application API with the settings shown on the right.
PteroBill requires different permissions than Pterodactyl-WHMCS, so make sure to create a new key if you're migrating.
Once you have the key created enter it in the Password field in the WHMCS server config.
PteroBill has an optional feature to add buttons in the Client Area that allows customers to reboot their servers without leaving WHMCS. If you want to enable this feature you'll also need to add an Account API key. This key must be made by a Pterodactyl Admin account for it to work.
If you created an Account API key enter it in the Access Hash field.
If you're using SSL make sure to check the Secure checkbox for SSL Mode.
Click Save Changes.
Product Configuration
PteroBill's time to shine is in the Product Configuration. It's here you'll configure the AutoAllocator that ensures you'll never have to manually activate a server again. Below you'll find a screenshot of the Module Settings page followed by a description of each field and how it can be configured.
Each field has a Help link next to it that you can hover over for a short description about that field. Options with blue text can be clicked to open a page with more details.
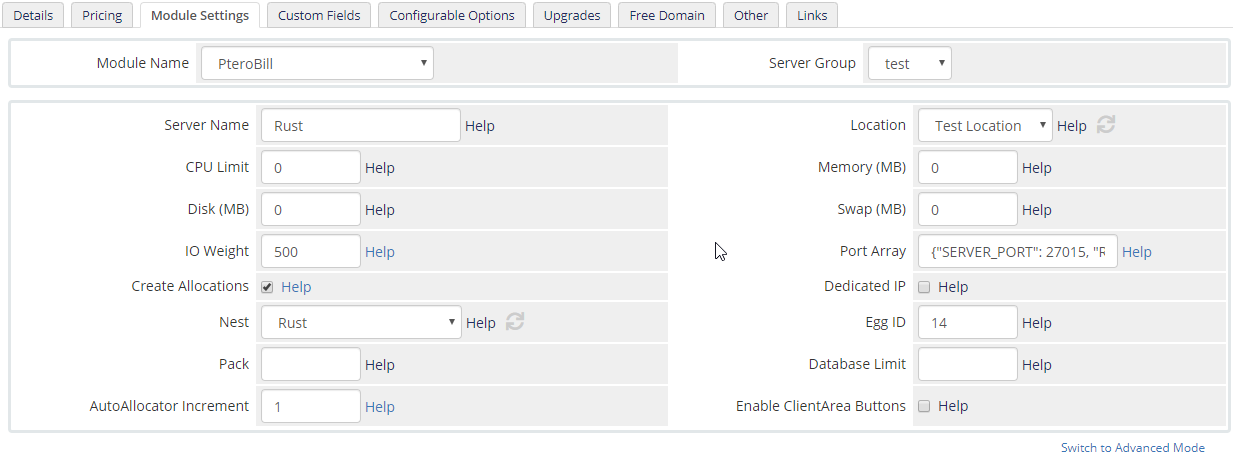
Module Name - Select PteroBill from the dropdown for the module name. If you don't see it be sure you followed the setup instructions in INSTALL.txt.
Server Group - Select the Server Group you configured in the Server Configuration step. If this isn't selected the Location dropdown won't be populated and none of your setups will work, so make sure it's set!
Server Name - The default name the server gets installed with. The user will see this name in their panel, so it often makes sense to name it after the Product. The user can update this later.
Location - This dropdown automatically populates your available locations from the panel. Select the default location to deploy this product to.
CPU Limit - CPU Limit is the amount of CPU that this server will be limited to. One CPU Core / Thread is counted as 100, so 100 for a single core, 250 for 2.5 cores, or 0 for unlimited CPU usage.
Memory (MB) - The maximum memory that this server will be able to consume. 0 for unlimited.
Disk (MB) - The maximum disk space that this server will be able to consume. 0 for unlimited.
Swap (MB) - The maximum disk space that this server will be able to use for swap space if it runs out of memory. 0 to disable swap, and -1 for unlimite swap space.
IO Weight - The IO Weight is the priority given to this server for disk access. Must be a value between 10 and 1000. To treat all servers leave this at the default of 500. For a detailed description of how IO Weight works click here.
Port Array - Port Array tells the Allocator which ports to assign this server. It must be valid JSON and it must include a value for SERVER_PORT. SERVER_PORT will be used as the default allocation, and any other entries will be added as additional allocations. For additional ports use "NONE" to just allocate the port, or a variable name such as "RCON_PORT" to override the Egg variables.
Examples of Port Arrays:
Ark - {"SERVER_PORT": 7777, "NONE": 7778, "QUERY_PORT": 27015, "RCON_PORT": 27020}
Arma 3 - {"SERVER_PORT": 2302, "NONE": [2303, 2304, 2306]}
CS:GO - {"SERVER_PORT": 27015}
Rust - {"SERVER_PORT": 27015, "RCON_PORT": 27016}
7D2D - {"SERVER_PORT": 26900, "NONE": [26901, 26902]}
Mordhau - {"SERVER_PORT": 15000, "QUERY_PORT": "15001", "BEACON_PORT": "15002"}
GTA: MTA - {"SERVER_PORT": 22003, "SERVER_WEBPORT": 22005, "NONE": 22126}
If the ports assigned in the Port Array are not available the Auto Allocator will keep searching for available allocations until it finds a match.
Create Allocations - This feature is not currently implemented. Once complete it will let PteroBill create allocations so you don't have to manually add them.
Dedicated IP - Assigns a true Dedicated IP, a feature not available in Pterodactyl. Tracks IPs that have been assigned as dedicated so future servers don't get assigned to that IP.
Nest - This dropdown automatically populates your available nests from the panel. Select the nest containing the egg for this product.
Egg ID - Egg ID from the Panel. Due to WHMCS limitations this isn't a dropdown, but hopefully in the future it can be.
Pack - Pack ID from the Panel.
Database Limit - Number of databases this server is allowed to create. 0 for none, leave blank for unlimited.
AutoAllocator Increment - Number of ports the Allocator increases by when searching. Defaults to 1, but can be increased if desired.
Template Variables
PteroBill exports some data from Pterodactyl to WHMCS that can be used in your client area product details template.
serviceurl - URL to directly access the server on Pterodactyl, e.g. "https://panel.domain.com/server/abc123"
rebooturl - URL to send a reboot request to the server (requires a client API key)
reinstallurl - URL to send a reinstall request to the server
memory - Memory allocated to the server, e.g. "1000 MB"
disk - Disk allocated to the server, e.g. "40 GB"
cpu - CPU allocated to the server, e.g. "150%"
location - The Pterodactyl Location name, e.g. "London"
server_name - The Pterodactyl Server Name
identifier - The Pterodactyl server identifier, abbreviated UUID, e.g. aa4256fe
server_ip - IP address of the primary allocation
server_port - Port number of the primary allocation
server_allocations - Array of all allocations assigned to the server
oomkill_enabled - True of oomkill is enabled for the server
databases_limit - The Pterodactyl database limit for the server
allocations_limit - The Pterodactyl allocations limit for the server
backups_limit - The Pterodactyl backups limit for the server
container_image - The container image for the server
startup_command - The startup command for the srever
container_env - Array of the environment variables for the container
nest_name - Name of the Pterdoactyl Nest
nest_description - Description of the Pterodactyl Nest
egg_name - Name of the Pterodactyl Egg
egg_description - Description of the Pterodactyl Egg
backups_list - Array of the server's backups
For example, to create a button that links to the server on the Pterodactyl panel use the following HTML:
<a href="{$serviceurl}" class="btn btn-success">Go to Panel</a>
Configurable Options and Custom Fields
You can use configurable options or custom fields to override certain values when your customer is placing an order. You can use this to let users pay for extra memory, faster cpus, or additional backups.
Below is a list of the variable names you can override.
server_name - Name that the server is created with in Pterodactyl
location_id - Pterodactyl location ID
port_array - Override the Pterobill port array
memory - Allocated memory
swap - Allocated swap
io - Disk IO weight
cpu - CPU shares
disk - Disk storage space
dedicated_ip - True for dedicated IP
egg_id - Egg ID
image - Docker image
startup - Startup command
databases - Number of databases
allocations - Number of allocations
backups - Number of backups
oom_disabled - True for disabled, ignored by Pterdoactyl API for many/all versions
username - Override the default generated username
If you are having trouble with your PteroBill setup you can file a ticket or join us on Discord for assistance.